Saturday, 25 June 2016
TWRP 3.0.2-0 For Yuphoria ~ UPDATE

TWRP is an open source, community project. TWRP development is done by roughly 4 people at this point. We also have a large support community with many people who are willing to answer questions and help people with their devices either through our IRC channel or on forums like xda-developers.
Team Win was originally formed to work on porting WiMAX to CM7 for the HTC EVO 4G. After our work on the EVO 4G we wanted to work on a project that would work on more devices than just the EVO 4G and we settled on working on a recovery. Today TWRP is the leading custom recovery for Android phones.
A custom recovery is used for installing custom software on your device. This custom software can include smaller modifications like rooting your device or even replacing the firmware of the device with a completely custom “ROM” like OmniROM
WHAT'S NEW
- Fix a bug with the input box that affected masked inputs (passwords). This fixes decrypt of full device encryption on devices that support decrypt. This bug also impacts encrypted backups. Users are highly encouraged to stop using 3.0.1 if you use encrypted backups or if you need decrypt of data in TWRP
- Add Greek translation to some builds.
SCREENSHOTS


INSTRUCTIONS
IF YOU HAVE A OLDER VERSION OF TWRP
If you are already on existing TWRP just choose Install image -> navigate to downloaded recovery and choose it and install
FRESH INSTALL IF YOU DON'T HAVE IT ~ VIA FASTBOOT
fastboot -i 0x2A96 flash recovery twrp_3.0.2-0_lettuce.img
NOTE: Make sure you are on unlocked bootloader if you are flashing custom recovery for first time
OTHER NOTES
- Based On Latest Omni Source
- Based On Latest Cm 13.0 Kernel Source
- Stable
DOWNLOAD : LINK
[6.0.1]Vanilla Unicorn MM Rom for Yu Yuphoria

This is a custom rom based on the CyanogenMod projects, with many more features & customizations. Of course, the Rom has been optimized for the best performance and stability.
With VanillaOS (VanillaUnicorn) you are going to have an outstanding experience with latest material design and custom VanillaUnicorn artwork. The UI is always changeable to your desires with the integrated Cyanogen ThemeEngine (CMTE). On top you get custom features to make your journey easier and more comfortable!
FEATURES
- Theme Engine
- Status Bar (battery, clock, date, etc)
- Hide superuser icon
- Disable heads up
- SELinux switch
- RAM usage bar
- Live Display
- Lock screen tweaks
- Nav bar customization (dimentions, layout, etc)
- Hardware keys actions
- Ambient display and wake gestures
- And a few more
SCREENSHOTS


INSTRUCTIONS
1. Wipe Data/cache (factory reset).
2. Flash ROM and then Gapps.
3. Reboot and Enjoy
SHORT REVIEW
I had just recently flashed this rom on my yu yuphoria and i can say this it is one of the best custom roms out there for the yu yuphoria. There are some bugs here but there but nothing major that will kill your device. Battery life it pretty good.The reason i can't show any battery stats is that the battery section in the settings section just for closes Hopefully the developer fixes this issue in the next build.As For me don't care about battery stats so it does not bother me much.I also loved the gesture integration in the rom and works pretty well.So overall a great rom a must try if you personally want to test this rom or use it as a daily driver as it is really stable rom
ROM : LINK
GAPPS :LINK [ARM64 PICO GAPPS RECOMMENDED]
CREDIT : sagarshah1729
Tuesday, 21 June 2016
Android Sources Highly Compressed & Developer Exchange

Android Developers, have many problems. One such of them is "SLOW INTERNET" or even "LOW BANDWIDTH".
Due to these problems, we are unable to sync the BIG chunk of Android source codes from the respective repositories.
Hence, most of the new and learning developers just fail at the first step: Downloading The Source Code!
So, here I present you with a thread, which contains links to download "HIGHLY COMPRESSED", untouched (unmodified) and full Android source codes of many different ROMs!
The links to the highly compressed source codes
What is Repo?
Repo is a repository management tool built on top of Git.
It’s first purpose is to downloads files from multiple git repositories into your local working directory (aka the source tree). That means that you won’t have to manually download or fetch the latest changes from about 300+ projects (depending on if you are downloading AOSP, CM or AOKP for example), repo will do it for you.
The second purpose of repo is to made it easy to submit your code contributions for review to a Gerrit server.
When you download a source code with repo, you get a folder named .repo in your working directory. It contains all the compressed and encrypted files that need to be in the source code.
After the source has been downloaded, the repo tool unencrypts and decompresses the files from the ".repo" folder and you get the source code in the working directory itself
What happens with the ".repo" folder?
It stays there, eating up the extra worthy space. A repo folder of cm12, when highly compressed is 10Gigs. An uncompressed one may be around 15Gigs.
What is the use of that folder?
If you want to UPDATE the sources, I mean update the current version of the source code, the repo folder comes handy. If you don't have the ".repo" folder, you may not be able to update the sources further. Like, if you want to get the latest patches, fixes, bug fixes, etc. you need to run:
Code: repo sync
later on. But not having the .repo folder will disable you to do that.
Even if you do not have the .repo folder, you will be able to compile the ROM with no problem! Do not worry if you are not able to download that. It is just needed to get fixes later on.
Note: You cannot go from cm12 source to cm12.1 or going cm12 to cm13 as these are different branches on the Cyanogenmod repo. No way doing that. You will have to manually download the new source.
AOSP
Marshmallow 6.0.1
- AOSP 6.0.1 (No Repo Folder Included) [Release Branch 30] [4.19 GB]
- AOSP 6.0.1 (Only Repo Folder) | Size: 15.1GB
Marshmallow 6.0
Lollipop 5.1.0
Lollipop 5.0.2
Kitkat 4.4.4
- AOSP 4.4.4 (No Repo Folder Included) | Size: 1.9GB
- AOSP 4.4.4 (Only Repo Folder) | Not Available

CyanogenMod
Marshmallow 6.0 (CM13)
Lollipop 5.1.1 (CM12.1)
Lollipop 5.0.2 (CM12)
Kitkat 4.4.4 (CM11)
Jellybean 4.3 (CM10.2)
- CM10.2 (No Repo Folder Included) | Size: 2.0GB
- CM10.2 (Only Repo Folder) | Not Available
Jellybean 4.2.2 (CM10.1)
- CM10.1 (No Repo Folder Included) | Size: 1.6GB
- CM10.1 (Only Repo Folder) | Not Available
Jellybean 4.1.2 (CM10)
- CM10 (No Repo Folder Included) | Size: 1.5GB
- CM10 (Only Repo Folder) | Not Available
Ice Cream Sandwich 4.0.4 (CM9)
- CM9 (No Repo Folder Included) | Size: 1.0GB
- CM9 (Only Repo Folder) | Not Available
Gingerbread 2.3 (CM7)
- CM7 (No Repo Folder Included) | Size: 0.6GB
- CM7 (Only Repo Folder) | Not Available
AOKP
Lollipop
- AOKP Lollipop (No Repo Folder Included) | Size: 3.6GB
- AOKP Lollipop (Only Repo Folder) | Size: 14.4GB
Kitkat
MiUi (PatchROM)
MiUi 7
MiUi 6
MiUi Kitkat
Omni
Lollipop 5.1
Lollipop 5.0
Pac-Man
Lollipop 5.1
Resurrection Remix
Marshmallow 6.0.1
Lollipop 5.1
Carbon
Lollipop
Kitkat
Lollipop 5.1
Resurrection Remix
Marshmallow 6.0.1
- Resurrection Remix 6.0.1 (No Repo Folder Included) | WIP[/SIZE]
- Resurrection Remix 6.0.1 (Only Repo Folder) | Size: 12.0GB
Lollipop 5.1
- Resurrection Remix 5.1 (No Repo Folder Included) | Size: 3.7GB
- Resurrection Remix 5.1 (Only Repo Folder) | Size: 12.7GB
Carbon
Lollipop
Kitkat
Paranoid Android
Lollipop
Blisspop
Lollipop 5.1
VentureROM
Kitkat
Lollipop
- Paranoid Android Lollipop (No Repo Folder Included) | Size: 3.3GB
- Paranoid Android Lollipop (Only Repo Folder) | Size: 12.8GB
Blisspop
Lollipop 5.1
- Blisspop 5.1 (No Repo Folder Included) | Size: 32.6GB
- Blisspop 5.1 (Only Repo Folder) | Size: 23.1GB
VentureROM
Kitkat
- VentureROM Lollipop (No Repo Folder Included) | Size: 3.3GB
- VentureROM Lollipop (Only Repo Folder) | Size: 13.7GB
Euphoria
Marshmallow 6.0.1
Lollipop 5.1.1
SlimROMs
Lollipop
Kitkat
AICP
Kitkat 4.4.4
Marshmallow 6.0.1
- Euphoria 6.0.1 (No Repo Folder Included) | Size: 3.8GB
- Euphoria 6.0.1 (Only Repo Folder) | Size: 21.1GB | Uploading
Lollipop 5.1.1
- Euphoria 5.1.1 (No Repo Folder Included) | Size: 3.4GB
- Euphoria 5.1.1 (Only Repo Folder) | Size: 18.7GB
SlimROMs
Lollipop
Kitkat
AICP
Kitkat 4.4.4
TWRP
Marshmallow 6.0.1
Manifest
RootBox
Lollipop
Android x86
Marshmallow 6.0
Lollipop 5.1
Marshmallow 6.0.1
Manifest
RootBox
Lollipop
- RootBox Lollipop (No Repo Folder Included) | Size: 3.3GB
- RootBox Lollipop (Only Repo Folder) | Size: 17.2GB
Android x86
Marshmallow 6.0
- Android x86 6.0 (No Repo Folder Included) | Size: 2.2GB
- Android x86 6.0 (Only Repo Folder) | Size: 14.3GB
Lollipop 5.1
- Android x86 5.1 (No Repo Folder Included) | Size: 2.2GB
- Android x86 5.1 (Only Repo Folder) | Size: 12.7GB
FlymeOS
Lollipop
Mahdi
Kitkat
Gummy
Kitkat
Lollipop
- FlymeOS Lollipop (No Repo Folder Included) | Size: 1GB
- FlymeOS Lollipop (Only Repo Folder) | Size: 1.9GB
Mahdi
Kitkat
Gummy
Kitkat
FAQ
Q1> How should I extract the source?
Ans: If your archive is in .7z format, do this:
If your archive is in .tar.gz format, do this:
If your archive is in .tar.xz format, do this:
Now you have extracted the source.
Q2> I am not able to extract the source. What should I do?
Ans: You cannot extract source with GUI on the Archive Extractor. So, try the method I mentioned.
Q3> Is the size of all files 2GB? I saw the size 2GB on AndroidFileHost!
Ans: The mentioned size on the thread is correct. AndroidFileHost has some problems while showing file sizes for files above 2GB.
Q4> How do you compress them? I mean, I need the command so that I can help you out!
Ans: XZ_OPT=-9e tar cJfv tarfile.tar.xz directory
Q1> How should I extract the source?
Ans: If your archive is in .7z format, do this:
- Open Terminal
- Download 7zip if not done beforeCode:
sudo apt-get install p7zip-full
- Now cd to the drive where you have downloaded the sources
- Extract itCode:
7z x (file name here).7z
If your archive is in .tar.gz format, do this:
- Open Terminal
- Now cd to the drive where you have downloaded the sources
- Extract itCode:
tar -xvzf (file name here).tar.gz
If your archive is in .tar.xz format, do this:
- Open Terminal
- Now cd to the drive where you have downloaded the sources
- Extract itCode:
tar -xvJf (file name here).tar.xz
Now you have extracted the source.
Q2> I am not able to extract the source. What should I do?
Ans: You cannot extract source with GUI on the Archive Extractor. So, try the method I mentioned.
Q3> Is the size of all files 2GB? I saw the size 2GB on AndroidFileHost!
Ans: The mentioned size on the thread is correct. AndroidFileHost has some problems while showing file sizes for files above 2GB.
Q4> How do you compress them? I mean, I need the command so that I can help you out!
Ans: XZ_OPT=-9e tar cJfv tarfile.tar.xz directory
Thursday, 12 May 2016
[OFFICIAL]Paranoid Android for Yu Yuphoria ~ AKA LETTUCE

Paranoid Android is a custom ROM aiming to extend the system, working on enhancing the already existing beauty of Android and following the same design philosophies that were set forward by Google for Android Open Source Project.
CHANGELOGS
- Merge of android-5.1.1_r2 tag from AOSP
- Theme Engine support from CM-12.1 - Screenshot fixes (NPE and leaks)
- Cellular Networks migration (accessible through main settings now)
- MultiSIM support
- Mute notification sounds threshold
- ParanoidOTA revamp with Material update
- Status Bar’s Double Tap to Sleep
- Misc Bug Fixes
- Theme Engine support from CM-12.1 - Screenshot fixes (NPE and leaks)
- Cellular Networks migration (accessible through main settings now)
- MultiSIM support
- Mute notification sounds threshold
- ParanoidOTA revamp with Material update
- Status Bar’s Double Tap to Sleep
- Misc Bug Fixes
INSTRUCTIONS
NOTE : You need to be once on CyanogenOS 12
- Unlock bootloader
- Flash custom recovery
- Wipe Data / Factory reset
- Flash PA Zip
- Flash SU
- Flash GApps
- Reboot
NOTE : You need to be once on CyanogenOS 12
- Unlock bootloader
- Flash custom recovery
- Wipe Data / Factory reset
- Flash PA Zip
- Flash SU
- Flash GApps
- Reboot
SUPER SU : LINK
GAPPS [USE ARM64]: LINK
Thursday, 14 April 2016
How to Install Remix OS on Nexus 9 and Nexus 10

DESCRIPTION
Remix OS 2.0 brings a PC experience unlike anything on Android and an Android experience unlike anything on a PC.
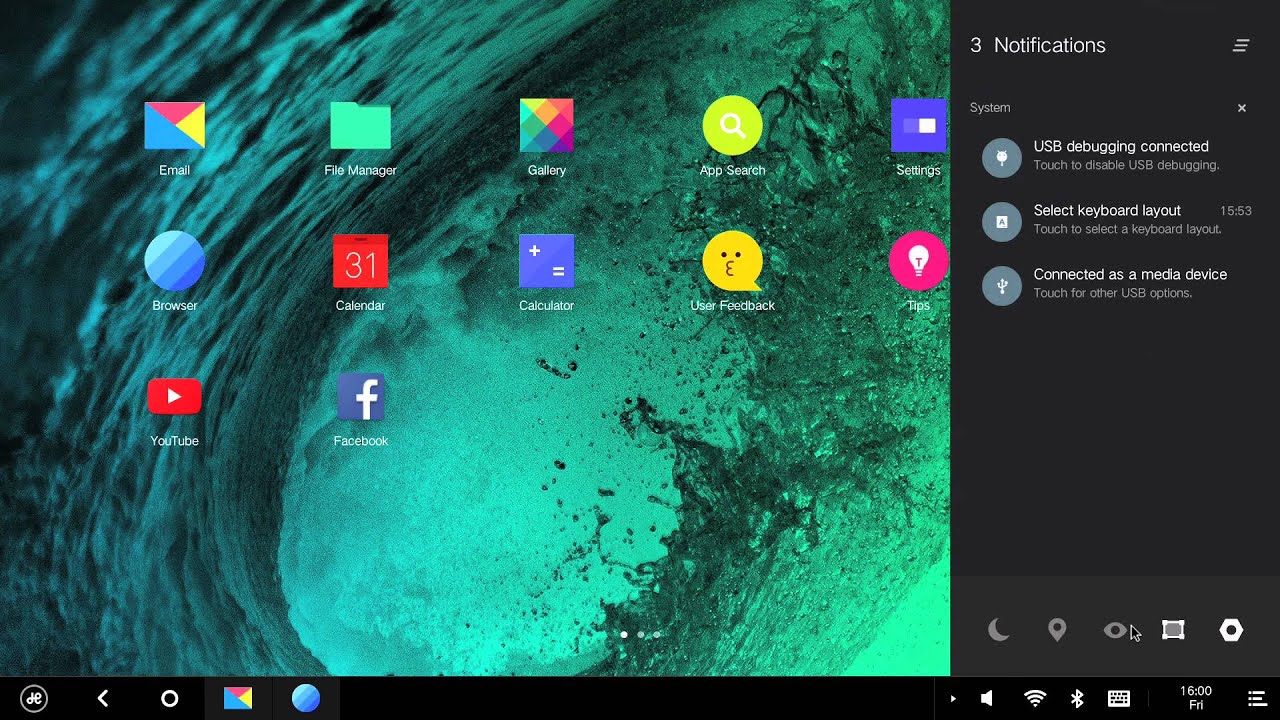
Engineered to bring you the best of both worlds – the harmonious fusion of a mobile and desktop experience, Desktop gives you access to important folders and shortcuts of most frequently used applications so you can focus on what you create rather than where to look for it.
Notifications and Taskbar have been given a complete makeover as well. With additional horizontal real estate, Notifications appears from the right side of your desktop. Complete with a Start Menu and System Tray, Taskbar allows you to find and start all your apps from one location on one side while managing everyday system settings and connectivity on the other.
Disclaimer: Flashing Remix OS ROM on Nexus 9 and 10 requires strong Android knowledge. Flashing this ROM on Nexus 9 and 10 will be at your own risk. You will have to bear responsibility for all the resulting consequences. Jide and androcontent will NOT be responsible for any damage caused.
Please backup your tablet data prior to flashing Remix OS 2.0. The factory image of Nexus 9 and 10 is based on Android 5.1.1. You can download the factory image here
INSTRUCTIONS
STEP 1: Installing adb tool : HERE
(If your computer already has adb tool, you can skip this step and go to step 2.)
- Download ADB-Fastboot tool and configure adb tool by following the instructions below.
- Verify adb tool configuration.
- Open Start Menu and enter cmd in Search. See below.
- Verify your PC sees the device by typing adb. If a series of demands show up on the screen, it indicates that the installation is successful.
STEP 2: Installing image files using fastboot
- Create a folder under C:\ and name it C:\ADB.
- Download image and place it in C:\ADB.
- Open cmd window and type CD /ADB.
- Connect the Nexus 9 and 10 to the computer via USB.
- Open a terminal on your PC and reboot the device into fastboot mode by typing adb reboot bootloader.
- Flash images onto your device by entering the following five commands:
- fastboot flash recovery recovery.img
- fastboot flash boot boot.img
- fastboot flash system system.img
- fastboot flash cache cache.img
- fastboot flash userdata userdata.img
- Clean the existing data by entering the following command:
> fastboot -w
- Once the flash completes successfully, run the following command to reboot the device into recovery to verify the installation. It might take a while. Please wait patiently. Do not force shutdown the device.
> fastboot reboot
SCREENSHOTS

DOWNLOAD LINKS
REMIX OS 2.0 [NEXUS 9] : DOWNLOAD
REMIX OS 2.0 [NEXUS 10] : DOWNLOAD
Android N Developer Preview 2 Finally Available!

Android N’s 2nd Developer Preview is now out for eligible Nexus devices. This developer preview is a culmination of feedback effort from developers, and as such, has ironed out a few bugs:
- Not being able to connect to hidden Wi-Fi networks (AOSP 203116)
- Multiwindow pauses (AOSP 203424)
- Direct Reply closing an open activity (AOSP 204411)
- Introduction and integration of Vulkan API for 3D rendering
- Launcher shortcuts on the default launcher: Shortcuts help perform specific actions quicker by providing easier access. Shortcuts contain an Intent for specific actions in the app, and providing these actions on the homescreen will improve UX by removing repetitive taps.
- Emoji Unicode 9 Support: The update now includes a People emoji which favors a more human-looking design, as well as adds in support for skin tone variations and Unicode 9 glyphs.

- API Changes: The Dev Preview update also contains refinements to previously introduced API’s. An example given is for Multi Window support, though you can find the other refinements by taking a look at the diff reports in the downloadable API reference package.

The Android N Second Developer Preview is currently available for the Nexus 6, Nexus 5X, Nexus 6P, Nexus 9, Pixel C and General Mobile 4G (Android One). Update to the Nexus Player will come in a few days. This and all other Developer Previews are intended for developers to use and test their apps on. They are not optimized for battery and performance, and as such, are not recommended as daily drivers.
Tuesday, 16 February 2016
STOCK ROM For Lenovo K4 NOTE

Disclaimer: I am not responsible for any damaged hardware or software arising from this process, so proceed at your own risk and don't forget to backup everything like imei(nvram) and others.YOU HAVE BEEN WARNED
DOWNLOAD STOCK ROM
OLD A7010a48_S143_151218_ROW : LINK
NEW A7010a48_S147_160113_ROW : LINK
Friday, 18 December 2015
[6.0.1] Mokee Rom for Redmi 1S (Marshmallow) (NIGHTLY)

MoKee OpenSource is based on the Google AOSP. We update our source code frequently to keep up with the latest development, and not forgetting to merge in special features of our own at the same time.
A small group of people from around the world who are interested in Android launched this project on the 12th of December 2012, and is committed to make this ROM better and better. Like most contributors of open source projects (Omni, CyanogenMod, Slim AOSPA etc), we are doing all these in our free time as our passion…
NOTE: After flashing any Kernel or ROM let your phone cool down to normal temp. before you start using it. Pls don't complain the phone is heating n lagging. Flashing anything have heavy CPU usage, thus result in heating.
CHANGELOGS : HERE (FULL)
SCREENSHOTS


INSTRUCTIONS
1. Install custom recovery (TWRP recommended)
2. Copy custom ROM zip file to sd-card (internal/external)
3. Boot into recovery mode
4. Now from recovery menu select backup
5. Take backup (previous stable)
6. Now select wipe
7. Advance wipe & select system, data, dalvik cache, cache
8. Now, swipe to wipe
9. Select install & select custom rom zip
10. Install success
11. Now install gapps
12. After installing gapps, wipe cache & dalvik cache
13. Reboot
NOTE : First boot always take sometime
BUGS
- When bluetooth is on, a log file is created in internal sdcard. You can manually delete it.
FACING BOOTLOOPS ????? READ THIS
1. Download this file and copy to the Sdcard or internal
2. clear cache/dalvik cache
3. flash firmware
4. reboot
DOWNLOAD LINKS
ROM: LINK
Gapps: LINK
Tuesday, 10 November 2015
Best custom rom for REDMI 1S (SUPER SMOOTH AND SUPER STABLE WITH AMAZING BATTERY LIFE)

I know beta releases of android marshmallow are out for the redmi 1S ,But hands down the best rom till date is paranoid android Build 6. I know build 7 is available but i felt it was a bit buggy at times so i sticked to Build 6 .Now you may have your own opinions about this but just hear me out i have tested nearly all roms for the redmi 1s like ASOP,CM 12,CM 12.1,CM 11, Temasek, Resurrection Remix,PAC-ROM,crDroid,Carbon and countless others you can check all of them out over HERE. Every rom that i had tested had some or the other thing that made to switch to other roms like sound distortion,buggyness,automatic reboots,battery life,heating issues etc.So when PA rom had released for the redmi 1s I had tested it out and also had made a post about a earlier on this blog. Initial releases had some bugs here and there but my GOD this rom is just awesome and can recommend this rom to any redmi 1s user ,As this rom is simple yet has may interesting needed features with are going to be used and not something that you may never be even touched the first place.This is super smooth, Batter life is just amazing at times i easily get around 4 hours on screen time on my daily use till the battery dies out.This rom is bug free and just makes the redmi 1s performs like a beast like any other mid to high end android phones and has been my go to custom rom after testing other custom roms out
The only bug which is found on this rom is the camera bug which is found on all of the AOSP rom for the redmi 1s but it can be fixed by flashing a custom kernel like XCELERATE kernel which is linked down below
BUILD LOGS (IF INTESTED)
BUILD 1
- Merge of android-5.1.1_r2 tag from AOSP
- Theme Engine support from CM-12.1 - Screenshot fixes (NPE and leaks)
- Cellular Networks migration (accessible through main settings now)
- MultiSIM support
- Mute notification sounds threshold
- ParanoidOTA revamp with Material update
- Status Bar’s Double Tap to Sleep
- Misc Bug Fixes
- Theme Engine support from CM-12.1 - Screenshot fixes (NPE and leaks)
- Cellular Networks migration (accessible through main settings now)
- MultiSIM support
- Mute notification sounds threshold
- ParanoidOTA revamp with Material update
- Status Bar’s Double Tap to Sleep
- Misc Bug Fixes
BUILD 2
- MSIM: Fix issues
- MSIM: Ability to hide empty sim card notifications
- Sound: connect/disconnect notification support (with ability to specify tone)
- Add option to disable search bar on recents
- Heads Up snooze (swipe up on a heads up notification initiates this)
- Change default mode of AppOps to make it more reliable
- Misc Bug Fixes
- Language translations (Thank you to our great Translators!)
- ParanoidOTA: fix inability to download OTAs
- M8 & Sirius: Enabled QuickBoot
- MSIM: Fix issues
- MSIM: Ability to hide empty sim card notifications
- Sound: connect/disconnect notification support (with ability to specify tone)
- Add option to disable search bar on recents
- Heads Up snooze (swipe up on a heads up notification initiates this)
- Change default mode of AppOps to make it more reliable
- Misc Bug Fixes
- Language translations (Thank you to our great Translators!)
- ParanoidOTA: fix inability to download OTAs
- M8 & Sirius: Enabled QuickBoot
BUILD 3
- MSIM: Fix FC's issues
- Wake on plug
- Home button wake
- Theme Engine bug fixes
- Volume Panel enhancements
- Low-level optimizations to our core base
- Loads of bug fixes for several NPEs, ANRs and OOMs.
- Wake on plug
- Home button wake
- Theme Engine bug fixes
- Volume Panel enhancements
- Low-level optimizations to our core base
- Loads of bug fixes for several NPEs, ANRs and OOMs.
BUILD 4
- Added Immersive Mode
- QS Reorder
- Many Bug Fixes
- QS Reorder
- Many Bug Fixes
BUILD 5
- Immersive mode QS detail panel clean up.
- QS reorder reset button is now either on Settings/Backup and Reset or long pressing the settings wheel in statusbar header
- Screen unpinning fixed on devices with hardware buttons.
- Volume Panel tweaks.
- Volume Key Controls Settings
- New Settings Cellular drawable
- Fixes to the status bar battery icon
- Much more
- QS reorder reset button is now either on Settings/Backup and Reset or long pressing the settings wheel in statusbar header
- Screen unpinning fixed on devices with hardware buttons.
- Volume Panel tweaks.
- Volume Key Controls Settings
- New Settings Cellular drawable
- Fixes to the status bar battery icon
- Much more
BUILD 6
- Added Live Display
- Many Bug Fixes
- Many Bug Fixes
BUILD 7
- Many Bug Fixes
FLASHING INSTRUCTIONS
- Flash custom recovery (if not flashed previously)
- Wipe Data / Factory reset
- Flash PA Zip
- Flash GApps
- Wipe Data / Factory reset
- Flash PA Zip
- Flash GApps
- Flash custom recovery
- Flash SuperSU Zip (if you need root access)
- Flash SuperSU Zip (if you need root access)
- Reboot
BATTERY STATS


NEED ANY HELP JUST COMMENT DOWN IN THE DESCRIPTION
Wednesday, 10 June 2015
OnePlus One Hydrogen OS: First Impressions

Download
You need to be part of the beta group in order to give this Hydrogen OS a spin. However, forum members have been kind enough to share their own links. You can find a number of download mirrors in the OP of this thread. Make sure you have decent download speeds and a reliable connection to download this 618 MB large ROM. There’s also a handy torrent present in the thread to help those with unreliable connections.Installation
For power users, this step should be no different from installing any other ROM.You will need:
- OnePlus One with unlocked bootloader
- Custom Recovery Installed (TWRP recommended, but others will work too)
- Place downloaded ROM zip file onto your internal sd card
- Reboot into recovery mode
- (Optional but recommended) Make a nandroid backup of your existing ROM
- Navigate in the recovery menu and wipe all partitions except your internal storage and USB-OTG
- Install the downloaded zip through recovery
The first boot will take some more minutes as all the 111 pre-installed applications initialize.
First Boot & Setup
On the first boot setup screen, you get greeted with the language selection menu offering options between two types of Chinese and thankfully, English. What follows the language screen are the usual guides for setting up the phone.


Surprisingly, I encountered the dialog box for Google’s Location Service permissions. This was surprising due to the fact that I did not flash any Google Apps package, meaning the Hydrogen OS ROM comes pre-installed with Google Services.
Homescreen & App Drawer
Once you exit the setup process, you land at the homescreen. For someone using an AOSP ROM for quite some time, this comes as a jarring surprise as Hydrogen OS does not feature a homescreen. Or an app drawer. What you land on is a mix of homescreen and app drawer, much like MIUI. The first page of the “homescreen” contains shortcuts to a few system apps, while swiping to the next page uses the card stack animation to display the rest of the pre-installed apps. You can uninstall user apps directly from here by dragging them to the bin icon.

Lockscreen

The
Lockscreen is very minimalistic, featuring only the date and time.
Swiping up unlocks the device. You can not access the notification
drawer, nor the quick settings panel from here. There are also
limitations on setting the Lockscreen wallpaper, as you cannot choose
outside of the handful of preset images.


Notification Drawer
Swiping from up to down on the homescreen actually brings up a quick search box for apps. To access the notification drawer, you have to make sure to swipe from the very top edge and actively try to start from the status bar. This does feel rather counter-intuitive on a 5.5″ phone as it deters one handed operation. Swiping down again on the notification drawer also does not open the Quick Settings panel, while the button on the right that does look like a switch for quick swap to Quick Settings instead takes you to the App Notification Manager screen.
When a notification arrives, swiping to the right will take you to the relevant app, while swiping to the left will dismiss it.
In the hunt for Quick Settings, I managed to swipe from the bottom of the screen, and lo and behold! The Quick Settings slides out halfway from the bottom to reveal shortcuts for various apps like Flashlight, Calculator, Camera and well, Settings. There are also icons for toggling various settings, just like how it is in the Quick Settings panel. There is also a dedicated toggle for VPN, which would come handy for their market.

Recents Panel
The Recent Panel follows the standard AOSP card style, with the addition of a kill-all button.
Settings
The Settings app is rather limited at first glance, offering only a few settings. However, a lot of other options are tucked away inside the visible options. For example, the Apps and Permissions option is home to other nifty features like a Startup Manager called as “Auto Startup”, the Notification Manager mentioned above and a Permission Manager (ala App Ops). The Advance Settings option brings up the Developer Options screen, which is enabled by default, saving you multiple taps on the Build Number (the entry of which does not exist).

Phone
The default app in Hydrogen OS features 3 tabs: Call Log (default), Contacts and a “Yellow Pages” tab, along with a Floating Action Button for displaying the dialpad. The Yellow Pages tab is one of those areas in Hydrogen OS which does not have any English elements, but based on my interaction, the tab contains shortcuts for services like Recharge, Cab Services, Movies and Travel.
Gallery
The Hydrogen OS Gallery app comes with two tabs: Photos and All Pictures. The Photos tab which is the default tab, displays only pictures and videos taken via the phone’s camera and is presented in a grid layout sorted through date.

Clock
The clock app is one of those areas where stock Android should borrow from, as far as theming goes. The 4 standard tabs are present: Alarm, Clock, Timer, Stopwatch.


Camera
The camera present is an unthemed, stock AOSP camera app. Stock functionality is intact, so nothing more to mention here.Calendar & Calculator
The calendar and calculator apps have also received a UI refresh, but both remain similar in functionality to their stock AOSP counterparts.


Browser
The Browser app sports a very iOS feel to it. There is a complete design refresh different from any other browser that I have ever used. The browser start-up page sports shortcut lists, along with a summary of previously visited URL’s. Unsurprisingly, the default search provider in the browser is from Baidu and not Google.

OnePlus Weather
This is an addition to the stock apps present. It features a unique design and animations. The app by itself is a visual treat as it makes use of the device sensors to alter the animations. For example, the falling rain drop animation is always falling downwards in the direction of gravity, irrespective of device orientation. A caveat of the app is that it may not find your location at all and is another area without English translation, thereby leaving you with a beautiful but useless app.

OnePlus Market
In the app drawer/homescreen, this app is simply mentioned as “Market”, but if the folders it created on my SD card are clues, this app is called OnePlus Market. This is another app which does not feature a word of English, so on the basis of UI, it looks like a standard market application for downloading apps and games.


Hydrogen OS Limitations
Out of the box, the ROM does not come with root access, which is standard for a ROM meant for the open market. This can be quickly remedied by flashing SuperSU‘s root package.The ROM is also missing some notable features which have become synonymous with the OnePlus. For one, there is no option to disable the capacitive buttons on the device and enable a navigation bar, something I personally prefer. There are also no screen off gestures present in the settings. The ROM also comes with Double-Tap-To-Wake disabled with no setting to enable it, but this can be remedied by using an app to enable it.
There is a lot of Chinese interspersed throughout apps, even though the system language has been set to English. Some design decisions like separate directional swipes for notification panel and quicksettings feel counter-intuitive and definitely need getting used to. The swipe up from below for the quick settings is a rather illogical decision on UX as there is no indication that something will even happen with a swipe up gesture (I “discovered” it on accident).
The status bar is left largely unused as it only houses the icons for Wifi, Signal Strength and Battery, while the left side of the status bar is always left unused for some reason, as it did not display any notification icons for me even when I had many. It might feel like a small caveat, but for me, I did not realise I had restored my 50+ apps via Play Store as there was no ongoing notification for the same.
The ROM also did not come along with a Music Player app and neither with a File Manager, so there is no way of accessing anything other than pictures and videos outside of the Photo app. Of course, Hydrogen OS is still Android, so you can always download alternatives from the Play Store.
Performance wise, the ROM performs better than Oxygen OS but does not match newer CM12.1 nightlies or CM12.1 based ROMs. There are no apparent lags, but apps take a tad-half-second longer to open even when I had a lot of free RAM. I could not thoroughly test battery life, but there were no indications that the ROM will give stellar battery performance, so by my estimates, it will be slightly improved or be at par with Oxygen OS but not within range of closer-to-AOSP options.
One important point to mention here is that the ROM is in limited beta release and is not a consumer release, so there is scope for things to get better.
Conclusion

For a normal consumer, Hydrogen OS in its beta state is definitely better than Oxygen OS in its release state. The UI is more polished, there are less graphical glitches, and it performs at par, if not better, with regards to performance and battery life. This does say something as Oxygen OS follows a more minimalistic approach from AOSP while Hydrogen OS goes in the opposite direction. As a ROM, Hydrogen OS is what Oxygen OS never was: a ROM to show off.
If you are content with using a closed source ROM made specifically for the Chinese market, then Hydrogen OS can become your daily driver. Even if you do not belong in that group, I recommend giving this ROM a spin only to experience something different in terms of UI. Be sure to have a nandroid backup as chances are, it may not become your daily driver in its current state.
What do you think of Hydrogen OS? Does the UI impress you on the first look? Do you feel OnePlus did a fair job with Oxygen OS? Let us know your thoughts in the comments below!
CREDITS : Aamir Siddiqui
Subscribe to:
Posts
(
Atom
)